BLE-Shield v2.0.0
The Arduino BLE-Shield v2.0.0 is the new Bluetooth Low Energy Shield which enables bidirectional communication from BLE (Bluetooth Low Energy) enabled devices such as iOS devices (iPhone 4S, iPhone5, iPhone5s, iPhone5c, iPad3, iPad4 and the iPad Mini) but also Desktops and Noteooks to to communicate with an Arduino board. The main focus of the Arduino BLE-Shield is to communicate with an iOS Device since this is the only way to transfer data between iOS and Arduino without Jailbreaking or the need for an MFi certified hardware peripheral.
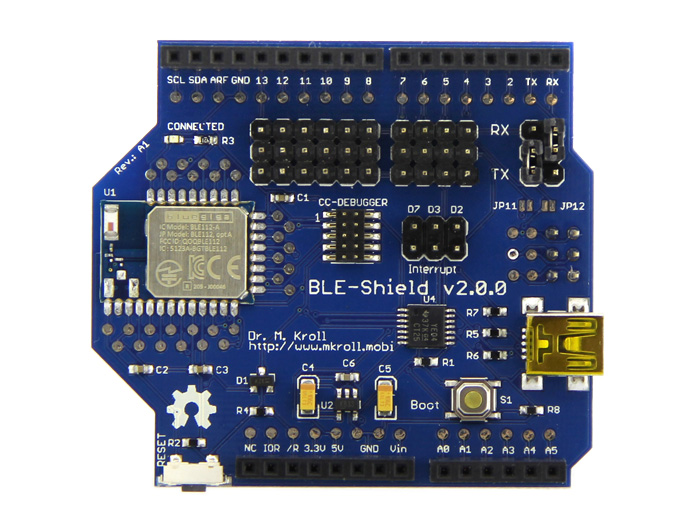
As the first BLE-Shield, the new one was developed to act as Peripheral so an iPhone can connect to it and read data from an Arduino or write data to it. Compared to the Shield v1.0.0 there are new features and changes on the hardware and the firmware as well.
The new hardware features are:
- Smaller SMD packages for resistors, capacitors, leds and level shifters were used where possible
- The Shield header is Arduino R3 compatible now which means that the two additional pins for I2C and the two new pins on the power header were added.
- The ICSP header is now available and broken out for another shield stack.
- Solderpoints added beneath all headers
- Solderpoints added beneath all BLE112 pins
- Reset switch will not reset the Arduino as well and a reset of the Arduino will reset the BLE-Shield now *The BLE Shield can now be configured to use all digital pins using simple jumpers (except pins D2 and D3 since they are used as interrupts)
- The BLE-Shield can be configured to provide an interrupt to the Arduino upon connection and disconnect. For this another jumper block has been added where you can configure pin 2, 3 or 7 as interrupt
- Added a Mini USB connector to upload a firmware update without need to bug a CC-Debugger
- Added an additional tactile switch, to boot the BLE112 in DFU mode. In this mode, the Shield can be flashed using an Mini USB cable and a commanline tool only
The new firmware features are:
- Supporting the new Bluegiga Bluetooth Smart SDK1.2
- Removed the internal buffer, so you can send even only one byte to the iPhone
- Characteristics for buffer handling removed
- Baudrate is now configurable. The default setting is 9600, but you can change it using a characteristic to 14400, 19200, 28800 and 38400
Service and Characteristics
Compared to the BLE-Shield v1.0.0 I’m using a new Service UUID to be advertised from the BLE-Shield. This way you can better distinguish the new from an older one, and you can directly access the characteristics without checking the hardware and firmware revision of the Shield before accessing the RX and TX characteristics.
Services
BLE Shield Service v2.0.0
B8E06067-62AD-41BA-9231-206AE80AB550
Characteristics
Bluetooth Device Address (Read):
65C228DA-BAD1-4F41-B55F-3D177F4E2196
RX (Read, Notify):
F897177B-AEE8-4767-8ECC-CC694FD5FCEE
The RX characteristic is used to receive data on the e.g. iOS Side. Whatever you write to the BLE-Shields TX pin will be notified on the RX characteristic on iOS. there is no longer an RX buffer involved which needs to be filled up before the buffer data is notified on the iOS Side. Every single byte is not notified.
TX (read, write, write-without-response):
BF45E40A-DE2A-4BC8-BBA0-E5D6065F1B4B
Data which is send from the e.g. iPhone to the BLE-Shields TX characteristic and is then received on the RX pin of the BLE-Shield. The maximum amount of data which can be send at once is 20 bytes due to BLE and iOS implementation restrictions.
Baudrare (Read, Write):
2FBC0F31-726A-4014-B9FE-C8BE0652E982
Supported baudrate values are:
- 0×00 = 9600 Baud (default)
- 0×01 = 14400 Baud
- 0×02 = 19200 Baud
- 0×03 = 28800 Baud
- 0×04 = 38400 Baud
The baudrate setting is written to the internal storage of the BLE112 module, so the setting will persist even if you remove power from the module. During the next boot cycle after repowering the module or resetting it, the baudrate setting is restored from flash. So there is no need to reconfigure the BLE-Shield every time you power the module.
Solder Jumpers JP11 and JP12 (BGLib Wakeup wiring)
The two solder jumpers JP11 and JP12 are intended for experienced users only. JP11 and JP12 are necessary if you would like to flash Jeff Rowbergs BGLib for Arduino using Module and Host Wakeup configurations: https://github.com/jrowberg/bglib/tree/master/BLEFirmware/BGLib_U1A1P_38400_noflow_wake16_hwake15 Solder Jumper JP11 connects Pin P1_5 of the BLE112 module to Arduino’s pin D4 and JP12 is used to connect BLE112’s pin P1_6 to Arduino’s pin D5. Using the two jumpers you can enable real sleep modes for the BLE112 using Arduino.
In order to flash Jeff’s BGLib Arduino firmwares you need a CC-Debugger, since it uses another hardware configuration in hardware.xml which cannot be changed using DFU Mode firmware upgrades as described in the next section.
Firmware Update using DFU Mode
Yes the new BLE-Shields v2.0.0 firmware can be updated using a simple USB Mini Cable without need to purchase a CC-Debugger from TI. The implemented mechanism need to add some BGScript code in order to enable the mechanism for the new firmware as well. The DFU mode flashing relies on the USB Windows driver and the dfu commandline tool provided as part of Bluegigas SDK. The Firmware Upgrade mechanism will be only supported with firmwares I will provide on github. If you somehow brick the BLE-Shield using a firmware you created youself, you might need a CC-Debugger in order to reflash the original firmware again.
There need to be a snippet of code that deals with the DFU Mode push button on the Shield. The code will detect an interrupt fired by pressing the button and reboots the Shield in DFU mode. you can simply get it back to normal by pressing the Reset Button K1.
There is one major restriction with the DFU mode based firmware upgrade. You can only change the BGScript and the GATT, not the settings in hardware.xml of the firmware. But this is not a big problem if I need to fix some minor bugs or even add new functionality or characteristics and services to it. So stat tuned. I will add a description on how to upgrade the Shield’s firmware once it is necessary.
Available Firmwares for the second generation BLE-Shield
With availability of the BLE-Shield two firmwares will be provided. The original BLE-Shield v2.0.0 firmware acting as a BLE-Bridge between a supported Arduino board and an iBeacon compatible firmware.
The Original BLE-Shield v2.0.0 firmware
The BLE-Shield v2.0.0 is factory programmed with the original BLE-Shield firmware which is available from github through this link: https://github.com/michaelkroll/BLE-Shield/tree/master/firmware/BLE-Shield-v2.0.0.
The iBeacon compatible firmware
The first additional firmware for the BLE-Shield v2.0.0 is an iBeacon compatible firmware. This firmware has been uploaded to github as well which can be accessed here: https://github.com/michaelkroll/BLE-Shield/tree/master/firmware/BLE-Shield-v2.0.0-iBeacon.
Tested Arduino boards
At the time writing this page, I have tested the Arduino Leonardo and the Arduino UNO R3 since they both support the new extended header layout. The BLE Shield can be used with older Arduino boards as well, since it does not rely on the new pins but makes them available for other Shields that my be attached on top of the BLE-Shield.
Arduino Uno R3
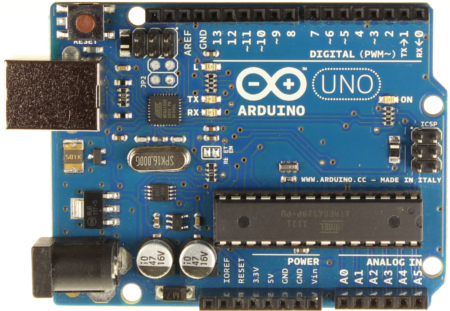
The original Arduino UNO is running the ATmega328. Resulting a serial port debug connection running on Serial (D0/D1) will somehow interfear with the Hardware Serial Port on D0/D1 to be used with the BLE-Shield. In order to overcome this issue I reccomend to use the Shield with a SoftwareSerial connection to pins D4/D5. Please connect the new jumpers accordingly to use the simple test sketch that is available on github: Arduino UNO R3 Sketch for this configuration. This sketch uses the new Interrupt on Connect/Disconnect feature of the Shield as well. It is configure to use Interrupt 0 on the Arduino UNO. Please jumper the Interrupt to D2. An overview of the available Interrupts and their pin mapping is available from this Link: http://arduino.cc/en/Reference/attachInterrupt
Arduino Leonardo
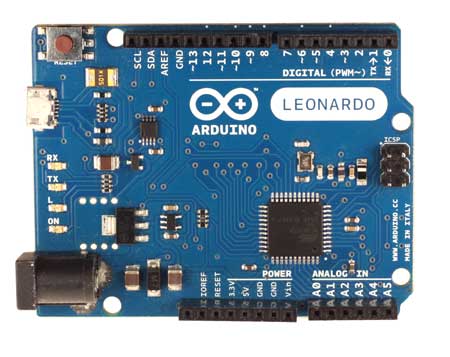
The Arduino Leonardo makes it more comfortable to use the BLE-Shield v2.0.0 since it provides two Hardware Serial Port. The USB/Console connection is available through the Serial and the the Hardware Serial Port on D0/D1 is available through the Serial1 Class. In order to use the sample sketch available on github: Arduino Leonardo, please jumper the serial port to be used on D0/D1 and jumper the interrupt to be used on Ppin D7. I mostly like this setup since I don’t need to add an additional library to my sketch and all is done with standard communication capabilities of the Arduino.
How to flash firmwares back and forth
In order to flash the factory programmed BLE-Shield v2.0.0 with the iBeacon compatible firmware, you need to download the Bluetooth Smart Software and SDK v1.2 from the following link: https://www.bluegiga.com/en-US/products/bluetooth-4.0-modules/ble112-bluetooth–smart-module/documentation/ In order to access the SDK, you need to open an account from Bluegiga, but as the told me they love to open accounts for new customers, so this would not be a burden.
Before digging into describing the flash process, take a look at the bare shield which is not connected to an Arduino and take a look at the components which are involved in the DFU firmware update process. The following image shows the BLE-Shield v2.0.0 where the Mini USB port is marked with the red arrow shown as red 1. and the enable DFU model tactile switch indicated by the red arrow marked with 2.
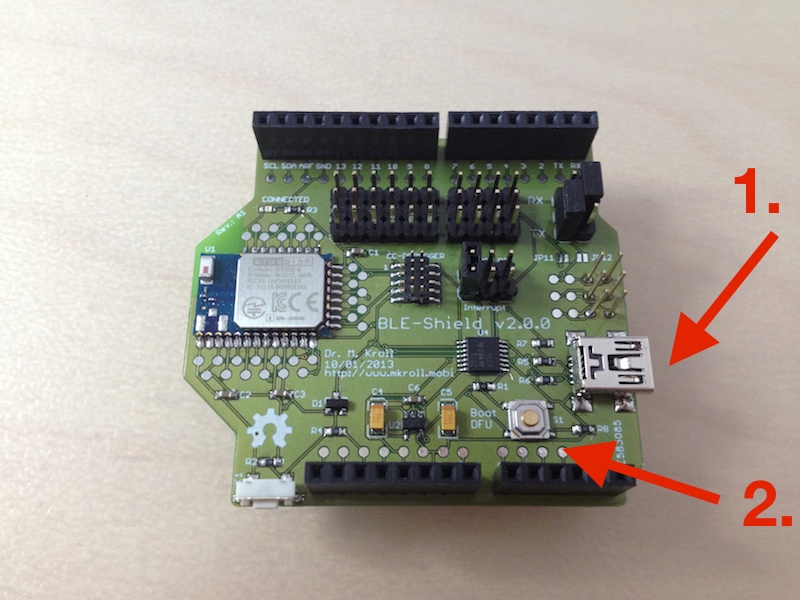
Connect a Mini USB cable to the BLE-Shield v2.0.0 and attach it to a PC running Windows7. OSX is not supported, since Bluegiga’s SDK and the drivers for the BLE112 are not available for this platform. Now that the BLE-Shield is connected to the PC over USB, please press the Boot DFU button on the BLE-Shield where the red arrow with 2. it pointing at. The blue LED on the BLE-Shield is now dimming blue (this is not the Blue LED of death, this is the correct behaviour).
On machines where the driver is not yet installed, your Windows Installation may tell you that there is no driver installed or that the driver has to be installed. When the Bluegiga SDK was installed to C:\Bluegiga\ble-1.2.1-91 you can find the windows driver in the directory C:\Bluegiga\ble-1.2.1-91\windrv. Please install the driver to proceed with the update process. Once you installed the driver, the BLE-Shield is attached over a USB Mini cable to your windows PC and you pressed the Boot DFU button, the BLE-Shield will be shown in the Device Manager of your Windows installation. Go to Control Panel -> Device Manager, where you should see an entry as shown in the below screenshot that a libusb device is available.

Before you flash the iBeacon compatible firmware or update the Shields firmware to a newer one, make sure that you downloaded the hex files from the BLE-Shield github pages.
The latest firmware files are the BLE-Shield v2.0.0 firmware which can be downloaded directly using this link:
The iBeacon compatible firmware can be downloaded through this link:
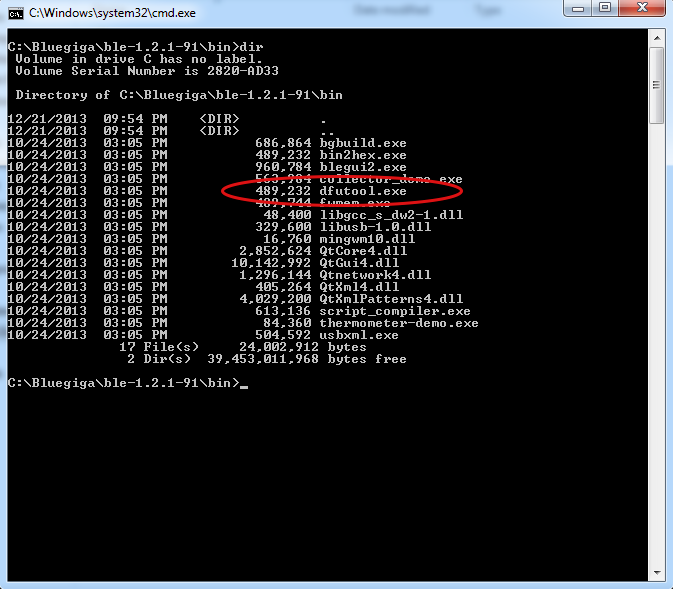
Here we will flash the iBeacon compatible firmware to the BLE-Shield so I will download the file BLE-Shield-iBeacon-firmware-2.0.0-BLE-SDK1.2.1-b91.hex to the C:\ directory of my windows machine. Once I downloaded the hex file to C:\ open a command line and change the directory to the bin directory of your Bluegiga SDK installation: C:\Bluegiga\ble-1.2.1-91\bin. In this directory you will find the tool dfutool.exe which will be used to update the firmware of the Shield.
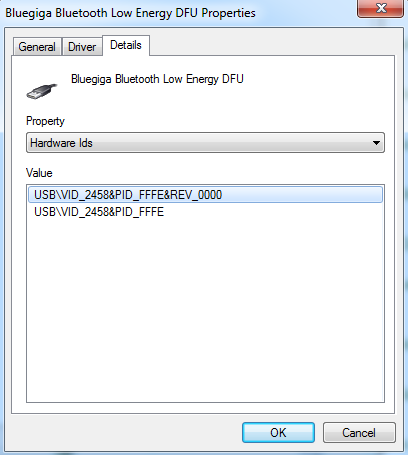
The dfutool takes two parameters: The VID:PID of the device to flash and the hex file to flash. You can find the VID and PID in the properties of the Bluegiga Bluetooth Low Energy DFU device entry in the device manager we discussed before. Open the properties dialog, show Details and then select Hardware Ids. You will find VID = 2458 and PID = FFFE as illustrated in the screenshot below.
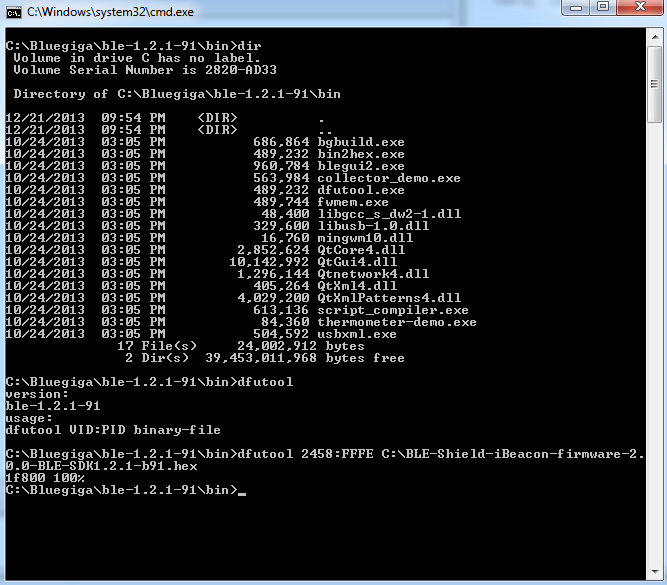
Now that we have all the information and data in place, we will change the BLE-Shields functionality into an iBeacon. Execute the following command from the command line:
C:\Bluegiga\ble-1.2.1-91\bin>dfutool 2458:FFFE C:\BLE-Shield-iBeacon-firmware-2. 0.0-BLE-SDK1.2.1-b91.hex
It will take approx. 10 seconds to flash the firmware. The progress is shown in the console and the command will exit once 100% is reached.
Now please press the Reset button below the OpenHardware icon on the BLE-Shields PCB to leave DFU mode and boot the shield in “normal” mode. You can leave the BLE-Shield connected to the USB port in order to power it and check the new functionality.
To check the functionality of the BLE-Shield which acts like an iBeacon now, please grab your iPhone, iPad or iPod with BLExplr installed. If you don’t have it yet, I recumbent you to download it from the Apple App Store since it is one good tool to use and test BLE devices an it is provided and maintained by me as well. If you have used the same iOS device with the BLE-Shield and it’s original firmware before, you might get a messed up view of services and characteristics in BLExplr. Please go to the devices settings and turn Bluetooth off and back on again. Hopefully the cache is emptied using this procedure.
After you connected the Shield with the new iBeacon compatible firmware, you will see a new service showing up. The BLE-Shield iBeacon Service which contains a characteristic for the Bluetooth Device Address, the proximity UUID, the Major ID and the Minor ID. The proximity UUID is set to “E2C56DB5-DFFB-48D2-B060-D0F5A71096E0” the major ID to “1” and the minor ID to “1” as well.
![]()
![]()
![]()
![]()
![]()
Now that the iBeacon is setup you can easily range it using BLExplr. So I will simply show another screenshot of the ranged beacon here: The one in the Immediate range is the BLE-Shield acting as an iBeacon.
![]()
In order to flash the firmware back to the original BLE-Shield v2.0.0 firmware, please download the firmware provided on github:
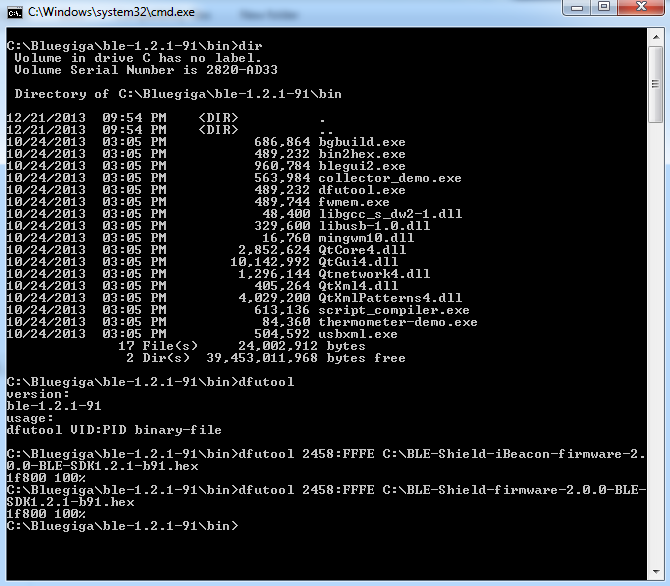
Copy the file BLE-Shield-firmware-2.0.0-BLE-SDK1.2.1-b91.hex to C:\ for your convenience, boot the Shield in DFU mode again by pressing the button on the shield, and call the dfutool again but now with the following parameters:
C:\Bluegiga\ble-1.2.1-91\bin>dfutool 2458:FFFE C:\BLE-Shield-firmware-2.0.0-BLE- SDK1.2.1-b91.hex
After a few seconds the dfutool will reach 100% again.
You can reset the shield by pressing the reset button again to boot it.
If you try to discover the BLE-Shield with BLExplr now and you will still see the BLE-Shield iBeacon Service in the App instead of the BLE Shield Service v2 (MK), please turn off Bluetooth in the Settings of your iOS device and turn it back on. Now you can discover the shield and you will see the original functionality of the BLE-Shield v2.0.0.
IMPORTANT NOTE: The new DFU update process is intended to be used by the author only. The Author will make sure, that a new firmware will include the mechanism to boot the BLE-Shield in DFU Mode. If you flash another BLE112 firmware to the Shield without the necessary code to detect the Boot DFU mode Button, you will never be able to update the firmware again using DFU mode. You can of course play around and create firmwares of your own, but you will do this on your own RISK ! Moreover you cannot change the hardware.xml settings using DFU mode. In order to change the hardware settings you need to reflash the firmware using TI’s CC-Debugger.